
To build DIY soft wall panels for your truck bed, start by selecting moisture-resistant foam like 1/8″ PAD-5 and durable fabric such as Sunbrella. Measure carefully, then cut foam and fabric, allowing extra for wrapping edges. Use spray adhesive to bond layers, and wrap fabric tightly around the foam for a smooth finish. Secure panels with fasteners, seal edges against moisture, and explore tips for neat assembly and reuse to protect fragile cargo effectively.
Key Takeaways
- Measure your truck bed accurately, including curves and fixtures, to create custom-fit soft wall panels.
- Use durable, moisture-resistant foam and weatherproof fabric like Sunbrella to cushion fragile cargo effectively.
- Cut materials precisely, wrapping fabric around foam with overlaps for a secure, professional finish that conforms to curves.
- Seal fabric edges and seams with waterproof spray for moisture resistance and added cargo protection.
- Store panels properly after use by cleaning and disassembling to maintain their shape and reusability.
moisture resistant foam for truck bed panels
As an affiliate, we earn on qualifying purchases.
As an affiliate, we earn on qualifying purchases.
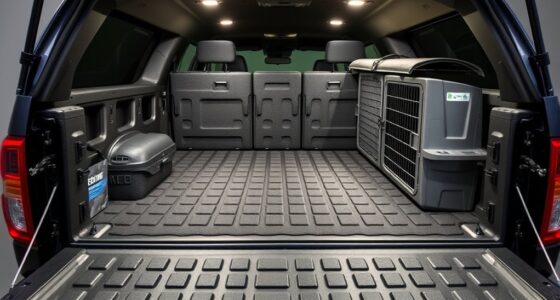
Selecting the Right Materials for Soft Wall Panels

Are you wondering how to choose the best materials for your soft wall panels? Start by considering durable, moisture-resistant options like closed-cell foam, such as 1/8″ PAD-5 Landau. It withstands impact and resists mold, making it ideal for cargo protection. Polyethylene foam, available in 1/8″ or 1/4″ thickness, offers firm support and excellent sound insulation. For the fabric, Sunbrella outdoor acrylic is a top choice because it’s abrasion-resistant and weatherproof, ensuring longevity. Lightweight materials like Duotex panels can be used in non-visible areas to reduce overall weight without sacrificing protection. For quick installs, self-adhesive panels with pre-mounted tape are convenient, especially in small or temporary setups. Choosing the right combination balances protection, durability, and ease of installation. Incorporating energy-efficient materials can also contribute to sustainable cargo management solutions.

Sunbrella Outdoor Fabric by The Yard | Bliss Sand (Solid) | Official Sunbrella Seller | Indoor or Outdoor Upholstery Fabric for Chairs, Cushions, Drapery, Pillows, Furniture
OFFICIAL SUNBRELLA FABRIC STORE 48135-0002: Your source for Sunbrella Fabric by the Yard, directly from the factory. Choose…
As an affiliate, we earn on qualifying purchases.
As an affiliate, we earn on qualifying purchases.
Measuring and Planning Your Panel Layout
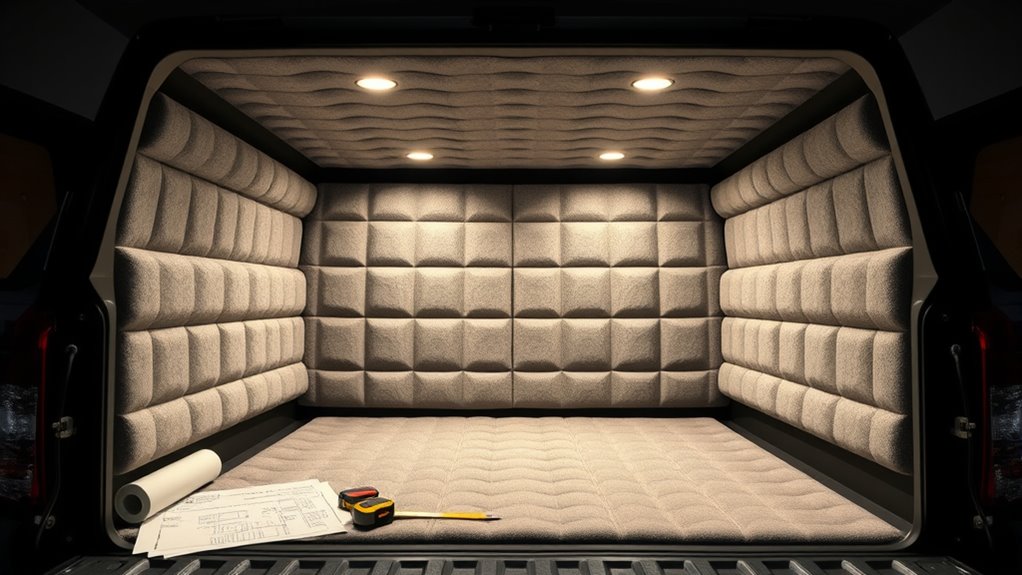
Before cutting materials, you need to carefully measure your space to guarantee a precise fit. Use a tape measure to record the length, width, and height of each section where you plan to install panels. Note irregularities like curves, angles, or obstructions such as wheel wells or tie-downs. Sketch a rough layout to visualize panel placement, considering overlaps of 2–3 inches for wrapping edges. Decide if you want full panels or modular sections for easier handling and adjustments. Measure each panel individually, recording dimensions accurately. Plan for gaps or seams, especially in irregular spaces, and mark mounting points for fasteners. Proper planning assures your panels will fit snugly, saving time during cutting and installation. Incorporating accurate measurements ensures the panels will align perfectly with your cargo space.

VViViD Black Indestructible Universal Rocker Panel Guard, 6" x 15ft – Truck Exterior Protection Film Kit for Rocker Panels Against Road Debris and Damage
The world's most durable removable, paint-replacement vinyl, available now for the first time in tape-roll format! Ideal for…
As an affiliate, we earn on qualifying purchases.
As an affiliate, we earn on qualifying purchases.
Cutting and Preparing Foam and Fabric Layers

To guarantee a precise fit and professional finish, start by measuring your panels carefully and transferring those measurements onto your foam and fabric materials. Use a sharp utility knife or scissors to cut the foam to the exact size, ensuring straight, clean edges. For thicker foam, a serrated knife or a hot wire cutter can provide smoother cuts. When preparing the fabric, cut it about 2-3 inches larger than the foam on all sides. This excess allows you to wrap the fabric tightly around the foam and secure it later. Be sure to keep your cuts straight and smooth to prevent puckering or uneven edges. Taking your time during this step ensures that your panels will fit seamlessly and look professional when assembled. Additionally, cutting tools that are sharp and suitable for your material will help achieve clean, precise edges.

XCEL Marine Foam Roll with Self Adhesive – Gray, 54" x 12" x 1/4" Closed Cell Foam Rubber Water Resistant Padding Sheet – Home, Marine, Garage, Automotive, Crafts & Cosplay (Gray, 54" x 12" x 1/4")
Marine Foam Padding Rolls & Sheets: Made of closed-cell foam rubber, these pads are naturally non-absorbent, extremely durable…
As an affiliate, we earn on qualifying purchases.
As an affiliate, we earn on qualifying purchases.
Applying Adhesives for Secure Bonding
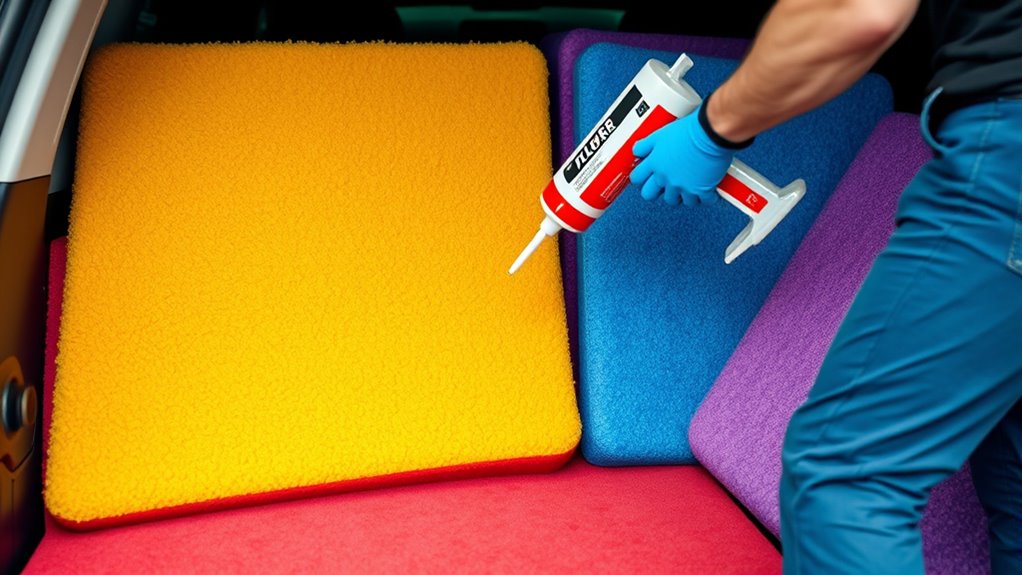
Applying adhesives correctly is essential for a strong, durable bond between your foam, fabric, and panels. Start by working in a well-ventilated area and wearing gloves to protect your skin. Use the right adhesive, like 3M 90 spray for foam-to-panel or fabric-to-foam bonding. Shake the spray can well, then apply an even, light coat to both surfaces, holding the can about 6-8 inches away. Wait a few seconds for the adhesive to become tacky, then press the foam or fabric firmly onto the panel. Avoid oversaturating to prevent seepage or mess. For larger surfaces, work in sections to ensure consistent bonding. Once applied, clamp or weight the panels temporarily if needed, allowing the adhesive to fully cure before proceeding. Proper surface preparation, such as cleaning and roughening the surfaces, can also significantly improve adhesion and durability surface preparation techniques.
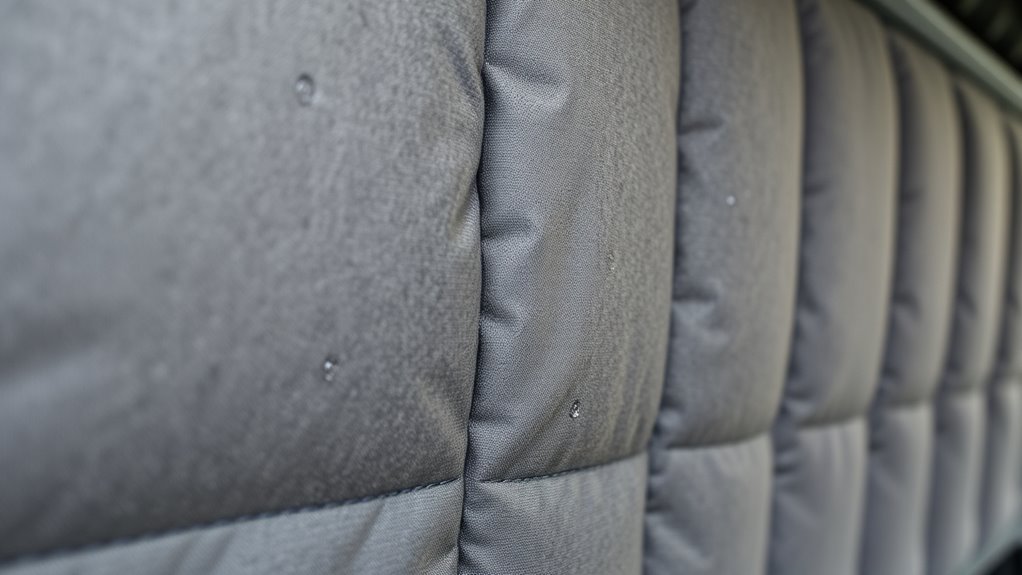
Wrapping and Trimming Panels for a Neat Finish

Once the adhesive has set and your panels are securely bonded, it’s time to wrap the foam and fabric for a clean, professional look. Carefully fold the excess fabric and foam edges over the panel’s sides, pulling tight to avoid wrinkles. Use a utility knife to trim any excess foam and fabric flush with the panel edges, ensuring a smooth, neat finish. For corners and curves, gently tuck the fabric around edges, smoothing out any bunching. Maintain consistent tension as you wrap to prevent sagging or wrinkles. If needed, secure the fabric with staples or glue at the back edges for extra hold. Take your time during trimming to achieve crisp, straight lines, giving your panels a polished, finished appearance. Additionally, paying attention to navigation and mapping techniques can help you precisely measure and cut curves or irregular shapes for a more tailored fit.
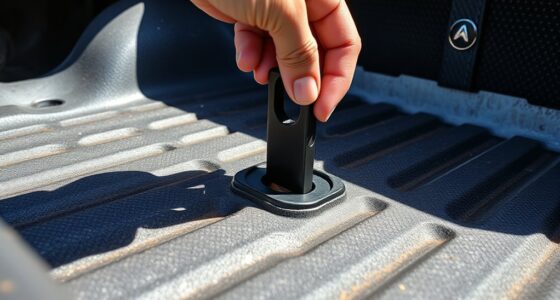
Attaching Panels Using Fastening Systems
Choosing the right fastening system guarantees your panels stay secure and can handle the load. You’ll want options that offer both strong hold and some flexibility for adjustments later on. By understanding your mounting choices, you can make your installation both durable and easy to reposition if needed.
Secure Mounting Options
Secure mounting options are essential for ensuring your soft wall panels stay firmly in place during transit or use. You want your panels to withstand movement without shifting or detaching. Using screws and rivnuts provides strong, adjustable attachment points, ideal for heavy-duty panels. L-track systems allow for quick repositioning and flexible layouts, making adjustments simple. Staples can secure fabric edges to wood panels, offering a clean finish. For corrosion resistance, use stainless screws and aluminum washers, especially in humid environments. Peel-and-Stick panels require no tools, perfect for temporary setups or low-stress applications. Here’s a quick comparison:
| Method | Best For |
|---|---|
| Screws and Rivnuts | Heavy-duty, permanent installation |
| L-track Systems | Repositioning, modular setup |
| Peel-and-Stick | Temporary, low-stress needs |
Additionally, selecting appropriate mounting hardware can help prevent damage to your cargo or panels over time.
Adjustability and Repositioning
To make your wall panels easy to move and adjust, selecting versatile fastening systems is essential. These systems let you customize your setup without hassle. Here are four options:
- L-track systems: Attach panels with hooks or sliders for quick repositioning.
- Screws and rivnuts: Use for a secure, adjustable fit that can be removed or repositioned as needed.
- Velcro strips: Perfect for lightweight panels, allowing easy removal and reattachment.
- Peel-and-stick panels: Offer tool-free, temporary placement for low-stress or occasional adjustments. Incorporating a contrast ratio adjustment can also improve the visibility and effectiveness of your panels in various lighting conditions.
Creating Curved or Irregular Panel Shapes

Creating curved or irregular panel shapes requires careful planning and precise techniques to achieve a seamless fit. Start by sketching your panel outline directly onto the foam or on paper as a template. Use flexible tools like a contour gauge or flexible ruler to trace curves accurately. Transfer the pattern onto your foam, then cut carefully with a sharp utility knife or hot wire cutter for smooth edges. For irregular shapes, scribe the foam using a flexible spline or bending a stiff wire along the desired curve before tracing. Sand edges smoothly for a clean finish. When wrapping with fabric, stretch it taut around curves to avoid wrinkles. These steps ensure your panels conform perfectly to irregular surfaces, providing professional-looking protection tailored to unique contours. Additionally, paying attention to safe installation practices helps prevent damage and ensures durability.
Sealing and Protecting Your Panels From Moisture
Sealing your panels effectively helps prevent moisture buildup that can lead to mold and deterioration over time. To do this, start by applying a waterproof sealant or spray to the fabric covering and edges of your panels. Here are four key steps:
Sealing panels prevents moisture buildup, mold, and deterioration effectively over time.
- Choose a suitable sealant—water-based polyurethane or weatherproof spray—to ensure moisture resistance.
- Apply evenly to all surfaces, paying special attention to seams and edges where moisture can seep in.
- Allow proper drying time before installing or using the panels to ensure full adhesion.
- Check periodically for any signs of wear or cracks, and reapply sealant as needed to maintain moisture protection.
This simple maintenance helps your panels stay dry, durable, and mold-free over time.
Tips for Maintaining and Reusing Your Soft Wall Panels

To keep your soft wall panels in top shape, regular cleaning and gentle repairs are essential. You can easily reinforce damaged areas and find smart storage solutions for reuse. With the right care, your panels can serve you well for many projects to come. Additionally, using air quality improvements such as air purifiers can help maintain a healthier environment around your workspace and prolong the lifespan of your panels.
Cleaning and Care Tips
Regular cleaning and proper maintenance are essential to keep your soft wall panels looking and performing their best over time. To do this effectively:
- Wipe surfaces with a damp cloth regularly to remove dust and dirt.
- Use a mild soap solution for stubborn stains—avoid harsh chemicals that could damage fabrics or foam.
- Spot clean fabric with a soft brush or cloth, ensuring you don’t soak the material.
- Check for loose or damaged areas periodically, resealing or reattaching parts as needed to maintain protection.
- Avoid excessive moisture or submerging panels in water, which can lead to mold or delamination. Moisture management is crucial for longevity and safety.
Store panels in a dry, cool space when not in use for extended periods. Proper care extends the lifespan of your soft wall panels.
Repair and Reinforcement Strategies
Maintaining your soft wall panels is essential for guaranteeing they continue to protect and enhance your space, especially as wear and tear can occur over time. Regularly inspect for rips, tears, or loose fabric edges, and repair them promptly with fabric adhesive or patch kits. If foam shows signs of compression or damage, consider replacing the affected sections with new foam cut to size, adhering it securely with spray adhesive. Reinforce weak points by adding extra screws, rivnuts, or L-track fasteners to ensure panels stay firmly in place. For areas prone to moisture or mold, clean surfaces with a mild disinfectant and seal the foam and fabric with protective coatings. These proactive steps extend your panels’ lifespan and maintain their protective performance.
Storage and Reuse Practices
Proper storage and reuse of your soft wall panels can considerably extend their lifespan and preserve their protective qualities. To do this effectively:
- Clean and dry the panels thoroughly before storing to prevent mold and damage.
- Disassemble panels carefully, removing fasteners and avoiding tearing the fabric or foam.
- Store flat or upright in a cool, dry place away from direct sunlight to prevent warping or fading.
- Label and organize panels by size or location for easy reinstallation later.
Frequently Asked Questions
How Do I Choose the Best Adhesive for Different Materials?
You should choose an adhesive based on the materials you’re bonding and the environment. For foam to fabric or panels, 3M 90 spray adhesive offers a strong, durable bond, while DAP Weldwood works better in high-heat areas. For quick, no-tool installation, self-adhesive panels are ideal. Always consider moisture, temperature, and material compatibility to make certain of a secure, lasting hold.
Can I Install Panels Without Using Screws or Rivnuts?
Imagine you want a quick, tool-free setup for your cargo protection. You can install panels without screws or rivnuts by using self-adhesive panels, like peel-and-stick tiles. These panels come with pre-mounted tape, making installation simple and reversible. Just clean the surface, peel off the backing, and press firmly. This method works great for lightweight or temporary protection, saving you time and avoiding permanent modifications.
What Is the Ideal Foam Thickness for Lightweight Protection?
The ideal foam thickness for lightweight protection is usually 1/8 to 1/4 inch. This range provides enough cushioning to absorb impacts and prevent cargo shifting without adding unnecessary bulk or weight. Thinner foam like 1/8 inch is great for delicate items or space-saving setups, while 1/4 inch offers extra protection for more fragile or heavier cargo. Choose based on your specific needs and available space.
How Do I Prevent Mold and Moisture Buildup Behind Panels?
To prevent mold and moisture buildup behind your panels, you should seal all edges and seams with a water-resistant sealant, like polyurethane. Guarantee proper ventilation by leaving gaps or installing vents, which helps air circulation. Use moisture-resistant materials such as closed-cell foam or foil-faced insulation. Regularly inspect the area for signs of moisture and wipe away any condensation. Proper sealing and ventilation keep your panels dry and mold-free.
Are There Removable or Temporary Panel Options for Quick Reconfiguration?
You can choose removable or temporary panels that make reconfiguring your setup feel like a breeze. Peel-and-stick panels are perfect—they require no tools, install instantly, and peel away without damage. Lightweight self-adhesive foam or fabric panels also provide flexibility, letting you adapt your cargo space quickly. With these options, you’ll transform your bed area in a heartbeat, turning chaos into order effortlessly and making every trip a smooth adventure.
Conclusion
Think of your soft wall panels as the gentle armor that shields your precious cargo, turning your truck bed into a sanctuary. With each carefully crafted panel, you create a haven where fragile items rest safely, like a nest cradling delicate eggs. Your hands have forged a barrier of protection—strong yet soft—transforming your vehicle into a fortress of care. Now, every journey becomes a confident voyage, knowing your cargo is held safe within your crafted sanctuary.