Before lifting your truck, understand the different lift types—body lifts are simpler, while suspension lifts offer greater off-road gains but require careful planning. You’ll need essential tools like jacks, wrenches, and torque wrenches, and should prepare your vehicle by inspecting suspension parts. Follow proper disassembly and installation steps, ensuring correct torque and alignment. Safety is key, so double-check everything after installation. If you want to know more about each step, keep exploring how to do it right.
Key Takeaways
- Assess your vehicle’s condition and choose the appropriate lift type (body or suspension) based on your off-road needs.
- Use quality tools like a floor jack, jack stands, torque wrench, and follow manufacturer guidelines carefully.
- Disassemble existing suspension components safely, keeping track of parts and using spring compressors when necessary.
- Ensure proper reassembly with correct torque settings, alignment adjustments, and inspection of all fasteners.
- Perform test drives and regular inspections post-installation to maintain safety, stability, and optimal performance.

Dynofit 3" Front & 2" Rear Lift Kits for 2007-2024 Silverado 1500 Sierra 1500 (2WD/4WD), Full Suspension Leveling Kit with Front Strut Spacers and Block U-Bolt Set
【Compatibility】2007-2024 Silverado 1500 2WD/4WD, 2007-2024 GMC Sierra 1500 2WD/4WD (New Body Style) with 6 lugs**Note: For 2019+ Silverado…
As an affiliate, we earn on qualifying purchases.
As an affiliate, we earn on qualifying purchases.
Understanding Different Types of Suspension Lifts

Understanding different types of suspension lifts is essential for choosing the right upgrade for your truck. There are two main types: body lifts and suspension lifts. Body lifts raise your vehicle’s body away from the frame using spacers, offering extra clearance without altering suspension components. They’re simpler and more affordable, suitable for aesthetic upgrades and light off-road use. Suspension lifts, on the other hand, modify or replace the suspension components to lift the entire vehicle, providing increased ground clearance and better off-road capability. These lifts range from moderate to extreme, affecting ride quality and handling. Knowing the differences helps you select the best option based on your needs, whether it’s for improved off-road performance or a more aggressive look. Proper comprehension ensures safe, effective upgrades aligned with your vehicle’s purpose. Additionally, understanding the impact on vehicle stability is crucial when planning any suspension modifications.

Rough Country 3.5" Bolt-On Lift Kit w/N3 Struts for 2005-2023 Tacoma – 74231
Give your Tacoma the Perfect Blend of Performance, Protection, and Style from Rough Country.
As an affiliate, we earn on qualifying purchases.
As an affiliate, we earn on qualifying purchases.
Planning Your Lift Kit Installation

Before you start installing your lift kit, evaluate your truck’s current condition to identify any worn or damaged parts. Gather all necessary tools, including a floor jack, torque wrench, and socket sets, to guarantee you’re fully prepared. Additionally, familiarize yourself with sound healing science principles, as understanding how vibrations can influence your vehicle’s performance might offer valuable insights during the modification process. Finally, review the manufacturer’s guidelines carefully to follow proper procedures and specifications throughout the process.
Evaluate Vehicle Condition
Evaluating your vehicle’s current condition is a crucial first step before installing a lift kit. You need to thoroughly inspect your suspension system for any pre-existing wear, damage, or worn parts that may need replacement. Check the shocks, springs, bushings, and mounting points for cracks, leaks, or corrosion. Confirm all components are functioning properly and haven’t been compromised. Take note of uneven tire wear or misaligned wheels, as these issues could affect the lift installation or indicate underlying problems. Verify that your vehicle’s frame and chassis are free of rust or structural damage. Addressing any existing issues beforehand helps prevent future complications, guarantees safety, and promotes peak performance once your lift kit is installed. Incorporating high-quality suspension components ensures the longevity and effectiveness of your lift.
Gather Necessary Tools
Gathering the right tools is a essential step to guarantee your lift kit installation goes smoothly and safely. Start by assembling necessary equipment like a sturdy floor jack and reliable jack stands to lift and support your truck securely. You’ll also need a torque wrench to tighten bolts to manufacturer specs, ensuring proper safety and performance. A complete socket set and wrenches are necessary for removing and reinstalling suspension parts. Spring compressors are indispensable if you’re working with coilovers or springs. Don’t forget a service manual specific to your truck, which provides essential torque settings and assembly sequences. Double-check that all lift kit components are included before you begin. Having everything ready beforehand prevents delays and helps you work efficiently and safely throughout the installation process. Additionally, proper planning frameworks can help you organize each step and ensure nothing is overlooked during the upgrade.
Review Manufacturer Guidelines
Reviewing the manufacturer’s guidelines is a crucial step that guarantees your lift kit installation goes smoothly and safely. Ignoring these instructions can lead to improper fitment, damage, or safety hazards. To ensure a successful upgrade, focus on these key points:
- Verify component compatibility to avoid mismatched parts.
- Understand torque specifications to prevent over-tightening or loosening bolts.
- Follow step-by-step procedures for disassembly and reassembly to avoid missed steps.
- Note any vehicle-specific adjustments needed for ideal alignment and performance.
- Pay attention to technical specifications like suspension geometry and dynamic contrast ratios to maintain optimal handling and safety during modifications.

Rough Country 2" Leveling Kit for Ford F-150 (2009-2026) & Ford Raptor (2017-2018) – Bolt-on Strut Spacer, Fits up to 33" Tires
Level Up Your F-150 Instantly: Eliminate the factory nose-down rake and achieve a sleek, aggressive stance with this…
As an affiliate, we earn on qualifying purchases.
As an affiliate, we earn on qualifying purchases.
Essential Tools and Equipment for the Job

To guarantee a safe and efficient suspension upgrade, you need to have the right tools and equipment on hand. A sturdy floor jack and reliable jack stands are essential for safely lifting and supporting your truck. A torque wrench ensures bolts are tightened to manufacturer specifications, preventing issues later. You’ll also need a thorough socket set and wrenches to remove and reassemble suspension components efficiently. Spring compressors are critical when installing coilovers or new springs, ensuring safe compression during installation. Don’t forget a detailed service manual for truck-specific torque settings and assembly instructions. Having these tools ready before starting saves time and reduces the risk of accidents. Additionally, understanding power tool safety and proper setup techniques helps prevent injuries and equipment damage. Double-check that all components and tools are available to keep the process smooth from start to finish.

DASBET Adjustable 2-Way Coil Spring Spacers 4 Pack, 1”-2” Lift or Lower Spring Compressor Tool, Mini Coil Spring Booster for Car & Truck Shock Absorbers, Automotive Strut Accessories (4)
Durable Construction: Crafted from high-quality carbon steel, these 2-Way Adjustable Spring Spacers offer a rigid structure that resists…
As an affiliate, we earn on qualifying purchases.
As an affiliate, we earn on qualifying purchases.
Preparing Your Vehicle for Lifting
Before lifting your truck, make sure the vehicle is prepared properly to prevent accidents and damage. Proper preparation helps ensure a safe, smooth upgrade process. Start by parking on a level surface and engaging the parking brake for stability. Next, inspect your suspension system for any pre-existing wear, damage, or worn parts that may need replacing before lifting. Confirm that all necessary tools and equipment are ready, including jacks, jack stands, and torque wrenches. Lastly, review the manufacturer’s installation guidelines thoroughly to understand specific requirements. Additionally, understanding Mad Tasting concepts can help you appreciate the importance of quality components and proper techniques in any upgrade process.
Step-by-Step Process for Removing Old Components
First, make sure your vehicle is securely lifted and supported on jack stands before you start removing any parts. Then, disconnect and disassemble the suspension components carefully, keeping track of each piece and its placement. Once everything is detached, lower the vehicle and prepare for the installation of your new suspension parts. To ensure safety and proper handling, consult mastering firewood tips for working safely and efficiently during your suspension upgrade.
Safely Elevating the Vehicle
Lifting your truck safely is a critical first step before removing old suspension components. Follow these steps to guarantee stability and safety:
- Park on a level surface and engage the parking brake to prevent movement.
- Loosen lug nuts slightly while the tires are still on the ground to make future removal easier.
- Use a floor jack to lift the vehicle at the manufacturer’s recommended lift points.
- Secure the vehicle with jack stands placed under solid chassis or frame points, then lower the jack completely.
- Always ensure your body jewelry materials are compatible with your work environment to prevent damage or contamination.
This process creates a stable, secure working environment, reducing the risk of accidents. Proper lifting assures you can work confidently and efficiently while removing or replacing suspension parts.
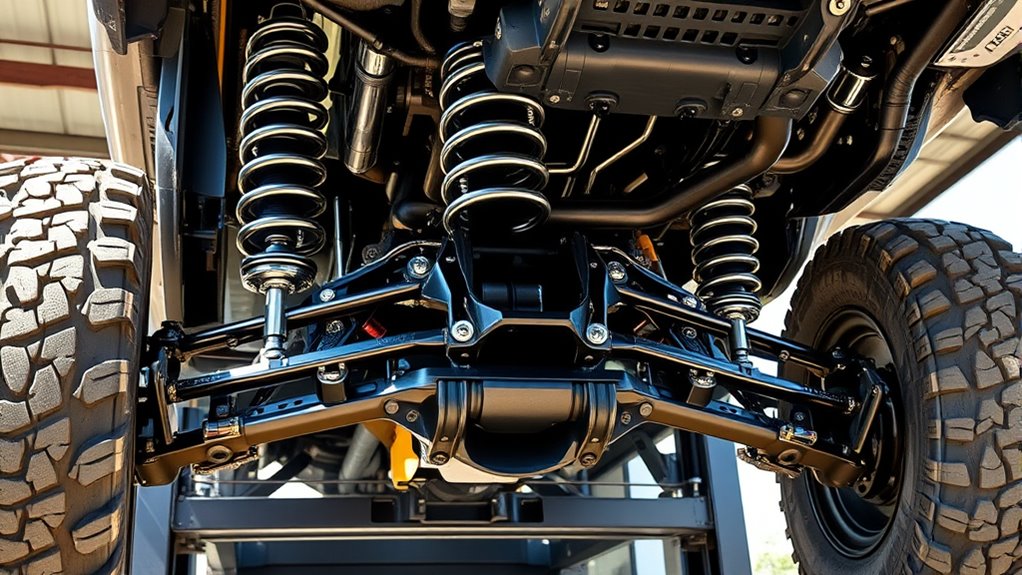
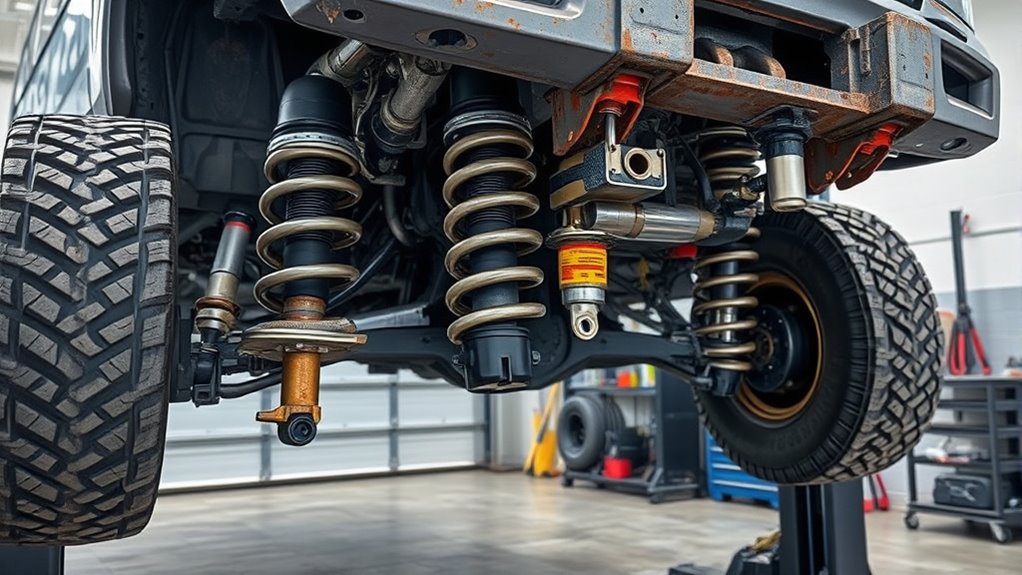
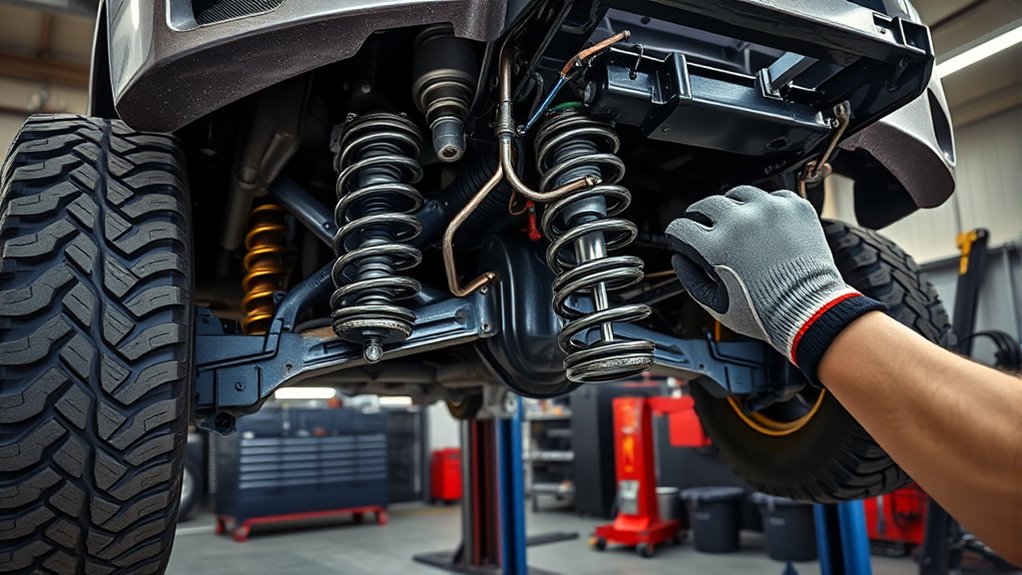
Disassembling Suspension Parts
To effectively disassemble your truck’s suspension, start by removing the wheels to gain clear access to the suspension components. Use a floor jack to lift the vehicle and secure it with jack stands for safety. Remove the lug nuts with a socket set and take off the wheels. Next, disconnect the shocks by loosening their mounting bolts, then remove springs or coilovers, taking care with spring compressors if necessary. Keep track of each part’s placement for reassembly. If your suspension has sway bars or control arms, disconnect those as well. Use the appropriate tools to carefully unbolt each component, noting their order and orientation. Finally, support the axle or chassis as needed before fully removing the old suspension parts.
Installing New Suspension Parts Safely and Correctly
Installing new suspension parts requires careful attention to detail to guarantee safety and proper function. First, verify all components match your kit and manufacturer instructions. Then, follow these steps:
- Use a torque wrench to tighten bolts to specified settings—over or under-tightening can cause failure.
- Apply anti-seize compound to prevent corrosion and seizure of bolts during future maintenance.
- Leave lower strut mount bolts loose until upper components are reassembled for proper alignment.
- Double-check all fasteners after initial tightening, especially after test drives, to ensure everything remains secure.
- Remember that proper suspension installation is essential for vehicle safety and handling performance, which can be enhanced by understanding suspension geometry.
Ensuring Proper Alignment and Reassembly

Ensuring proper alignment and reassembly after suspension work is vital for your truck’s safety and peak performance. First, double-check all bolts and fasteners, tightening them to the manufacturer’s specified torque using a calibrated torque wrench. Reinstall wheels securely, tightening lug nuts to the correct specs, then lower the truck carefully to the ground. Once on the ground, perform a visual inspection of all suspension components, making sure everything is seated properly and securely attached. Adjust the alignment as needed, focusing on camber, caster, and toe angles, to avoid uneven tire wear and handling issues. Tighten any loose bolts, and verify that all parts move freely without interference. Proper reassembly and alignment are essential to ensure your truck performs safely and smoothly after the upgrade.
Post-Installation Checks and Safety Tips

After completing your suspension upgrade, it’s important to perform thorough post-installation checks to confirm everything is secure and functioning properly. First, take a slow test drive to listen for unusual noises or handling issues. Second, recheck all fasteners and bolts, tightening them to the manufacturer’s specifications after about 50 miles of driving. Third, inspect suspension components for proper alignment and secure attachment, ensuring no parts have shifted during installation. Fourth, monitor your vehicle’s performance during the initial break-in period, paying close attention to ride quality and handling. These steps help ensure safety, longevity, and prime performance of your lifted truck. Regular inspections and timely adjustments safeguard your investment and keep you confident on the road.
Frequently Asked Questions
Can I Lift My Truck Without Professional Help?
You can lift your truck without professional help, but it’s risky if you lack experience. You need to thoroughly review the manufacturer’s instructions, gather all necessary tools, and follow proper safety procedures. make certain the vehicle is securely supported on jack stands, and take your time during installation. If you’re unsure about any step, it’s best to consult a professional to avoid damaging your truck or causing injury.
Will Lifting Affect My Vehicle’s Fuel Efficiency?
Lifting your truck can reduce fuel efficiency because it increases aerodynamic drag and weight, making the engine work harder. The larger tires and higher ride height also add resistance, further decreasing mileage. However, proper installation and choosing the right lift kit can minimize these effects. Keep in mind that regular maintenance and mindful driving can help offset some fuel loss, but expect a slight decrease in efficiency after lifting your vehicle.
How Long Does a Full Suspension Lift Installation Take?
Picture yourself under your truck, tools in hand, ready for a transformation. A full suspension lift usually takes between 6 to 12 hours, depending on your experience and the kit complexity. You’ll work through removing old parts, installing new components, and aligning everything perfectly. Rushing isn’t worth safety, so plan accordingly. Expect some breaks, a thorough check, and patience to make certain your lift is done right and safe for the road ahead.
What Are the Legal Limits for Truck Lift Heights?
You should verify your local laws for truck lift height limits, as they vary by state or municipality. Generally, the maximum height ranges from 6 to 12 inches, but some areas have stricter regulations on overall vehicle height and bumper height. Make sure to stay within legal limits to avoid fines, ensure safety, and keep your vehicle street-legal. Always verify with local authorities before lifting your truck.
Do I Need New Wheels or Tires After Lifting?
You might need new wheels or tires after lifting your truck, especially if the lift causes your current tires to rub against suspension parts or fenders. Larger tires often require wider or taller wheels for proper fitment. Check clearance and consult your suspension kit instructions. Upgrading to appropriately sized wheels and tires guarantees safety, peak performance, and prevents damage, making your lifted truck look great and handle smoothly.
Conclusion
Think of your truck’s suspension upgrade as giving your vehicle a new pair of shoes—fit, comfort, and performance all depend on the right choice. With careful planning and proper installation, you’ll have a truck ready to conquer the roughest terrains and turn heads on the road. Just remember, like a skilled tailor, take your time to make sure every part fits perfectly. Your upgraded truck will be ready to hit the trails with confidence and style.