
To fix small dents in your truck bed, start by cleaning the area with isopropyl alcohol and heating it with a heat gun to soften the metal. Use glue pullers and specially designed tabs to gently pull the dent out, being cautious not to over-pull. Regularly check your progress to avoid creating high spots. For tougher dents, consider advanced techniques or combined methods. By following these steps, you can prevent future damage and maintain your truck’s appearance—learn more about effective repair strategies.
Key Takeaways
- Thoroughly clean the dented area with isopropyl alcohol to ensure proper adhesion of glue during repair.
- Carefully heat the dented metal using a heat gun to increase pliability for easier manipulation.
- Use appropriate glue tabs and a bridge puller to gently pull the dent out in small increments, monitoring progress.
- Avoid over-pulling by frequently checking the surface to maintain a near-original finish and prevent high spots.
- Combine glue pulling with pushing techniques for more extensive dents, ensuring a well-executed repair before applying any protective coatings.

GLISTON 45pcs Paintless Dent Repair Tool Dent Puller Kit, Adjustable Width, Pops a Dent Car Dent Removal Kit, Golden Lifter, Bridge Puller& Glue Gun for Automobile Body Motorcycle Refrigerator
UPGRADE DESIGN: Compared to the old version paintless dent repair kit, the new dent lifter can adjust more…
As an affiliate, we earn on qualifying purchases.
As an affiliate, we earn on qualifying purchases.
Understanding Paintless Dent Repair (PDR) Techniques

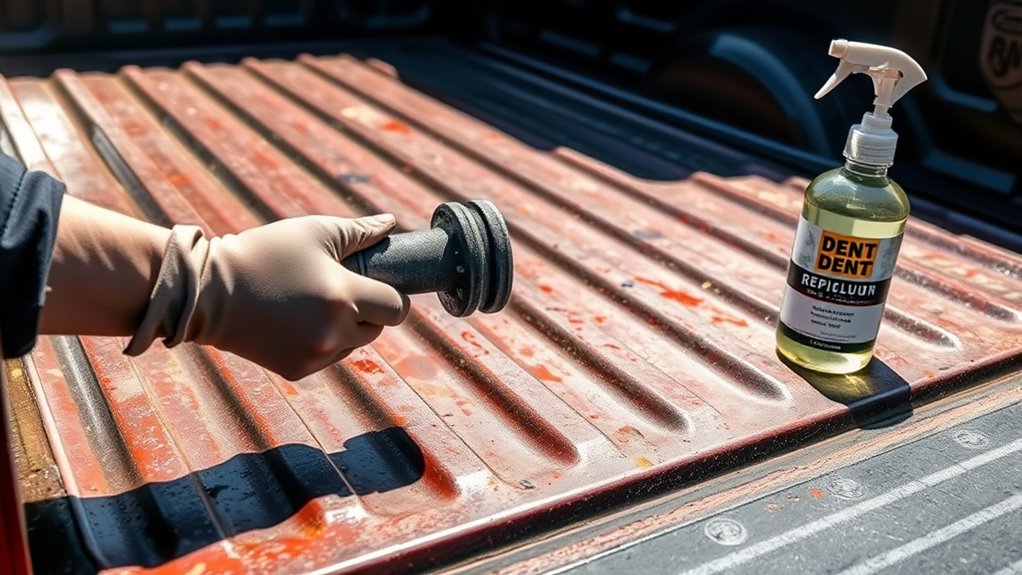
When it comes to fixing dents in your truck bed, understanding Paintless Dent Repair (PDR) techniques can make the process simpler and more effective. PDR allows you to restore your truck’s surface without repainting or using body filler. You’ll primarily use glue pulling methods, which involve applying hot glue to specially designed tabs that adhere to the dent. By carefully pulling these tabs, you can pop the dent out, especially effective on tougher metals like those in truck beds. Heating the metal before you start softens it, improving results. Remember to choose the right size tabs for various dent shapes and creases. Mastering these techniques can save you time and preserve your truck’s original finish.
GLISTON 45pcs Paintless Dent Repair Tool Dent Puller Kit, Adjustable Width, Pops a Dent Car Dent Removal Kit, Golden Lifter, Bridge Puller& Glue Gun for Automobile Body Motorcycle Refrigerator
UPGRADE DESIGN: Compared to the old version paintless dent repair kit, the new dent lifter can adjust more…
As an affiliate, we earn on qualifying purchases.
As an affiliate, we earn on qualifying purchases.
Essential Tools and Materials for Truck Bed Repairs

Having the right tools and materials is essential for effectively repairing dents in your truck bed. Start with a heat gun or torch to soften the metal before you apply any pulling methods. You’ll need glue pullers, like bridge pullers, to create controlled pulling force. Stock up on various sizes of glue tabs—different shapes will cater to specific dent sizes. A knockdown hammer and leather-covered push rods will help you smooth out any irregularities after pulling. Additionally, ensuring your truck is equipped with proper cybersecurity solutions will protect against data breaches while maintaining your vehicle’s appearance. Furthermore, utilizing energy-efficient ventilation considerations during your repairs can enhance the overall process. Knowing how to fly safer and smarter with drone insights can also help you assess the damage from above. Recent studies indicate that using energy-efficient techniques can significantly lower costs in vehicle maintenance. Finally, keep cleaning agents like alcohol handy to prep the surface, ensuring better adhesion. With these tools, you’ll be well-equipped to tackle those dents and maintain your truck’s appearance. Using energy-efficient techniques in your repairs can also contribute to a more sustainable solution for vehicle maintenance.
GLISTON 45pcs Paintless Dent Repair Tool Dent Puller Kit, Adjustable Width, Pops a Dent Car Dent Removal Kit, Golden Lifter, Bridge Puller& Glue Gun for Automobile Body Motorcycle Refrigerator
UPGRADE DESIGN: Compared to the old version paintless dent repair kit, the new dent lifter can adjust more…
As an affiliate, we earn on qualifying purchases.
As an affiliate, we earn on qualifying purchases.
Preparation Steps for Effective Dent Removal

Before you start fixing those dents, you need to prepare the area properly. Clean the surface thoroughly to remove any dirt or oils, then heat the metal to make it more pliable. Additionally, it’s important to keep in mind that exfoliation leads to a refined surface, which can enhance the effectiveness of your repairs. Using a styling cream can help provide a smoother finish before you begin. Finally, assess the size of the dent to choose the right tools for the job. Additionally, consider using guiding techniques to ensure your repairs are as effective as possible.
Clean the Surface
Cleaning the surface of your truck bed is essential for effective dent removal. Start by gathering a clean cloth and some isopropyl alcohol. Wipe down the dented area thoroughly to remove any dirt, grease, or residue. This step guarantees that the glue tabs will adhere properly during the repair process. Make sure to pay attention to any creases or edges where dirt can accumulate. After cleaning, let the area dry completely; this prevents moisture from interfering with adhesion. Avoid using strong solvents or abrasive cleaners that could damage the paint. A clean surface not only enhances glue bond strength but also minimizes the risk of paint damage, ensuring a smoother repair process. Additionally, utilizing smart appliances can help streamline your overall maintenance routine. Proper surface preparation is crucial as it directly relates to adhesion properties that can impact the success of your repair. Remember that maintaining color accuracy in your vehicle’s paint can also contribute to a more uniform appearance after repairs. Taking care of your vehicle can be considered a form of compassionate caregiving, as it reflects your respect for its longevity and performance. Take your time to get it right!
Heat the Area
To guarantee successful dent removal, it’s essential to heat the area around the dent before applying any tools. Start by using a heat gun or a torch, maintaining a safe distance to avoid damaging the paint. Aim for a temperature that softens the metal without causing bubbling or cracking. This process increases the metal’s pliability, making it easier to manipulate during the repair. Once heated, you’re ready to apply glue or use pushing tools effectively. Remember, heating not only prepares the metal but also enhances the adhesion of your glue tab. Take your time with this step; a properly heated area will greatly improve your chances of a smooth, successful dent removal without compromising the truck bed’s finish. Additionally, be mindful of user privacy when using tools that generate heat, as some may affect your surroundings. Proper heating techniques can also prevent metal fatigue that could lead to further damage in the future. Furthermore, applying quality assurance measures during the repair process ensures that the dent removal is effective and lasting. A well-prepared environment is key to maintaining home safety during these types of repairs. Ensuring a controlled environment can also help mitigate safety risks associated with heat application.
Assess Dent Size
When evaluating the size of a dent in your truck bed, it’s vital to determine both its depth and width to choose the right repair approach. Here’s how to assess the dent size effectively:
- Depth Measurement: Use a ruler to check how deep the dent is. This helps you decide if it’s a minor or more significant repair job. Many minor dents can be easily fixed using best esthetician magnifying lamps, which enhance clarity during the repair process.
- Width Measurement: Measure the width of the dent to understand its overall size. Wider dents may require more extensive repairs or specialized tools.
- Shape Evaluation: Note the shape of the dent—whether it’s round, creased, or irregular. This information is indispensable for selecting the appropriate glue tab or repair method. Additionally, understanding how curiosity enhances problem-solving abilities can inspire innovative techniques for tackling dent repairs.

SEEKONE Heat Gun 1800W 122℉-1202℉(50℃- 650℃)Fast Heating Heavy Duty Hot Air Gun Kit Variable Temperature Control Overheat Protection with 4 Nozzles for Crafts, Shrinking PVC, Stripping Paint(5.2FT)
▶ 【Strong Power With 2 Modes】 SEEKONE 1800W heat gun provides strong power quickly heat up to 1202℉(650℃)…
As an affiliate, we earn on qualifying purchases.
As an affiliate, we earn on qualifying purchases.
Step-by-Step Guide to Fixing Small Dents

Before you plunge into fixing those small dents in your truck bed, it’s essential to gather your tools and materials to guarantee a smooth repair process. Start by cleaning the dent area with alcohol to make sure the glue adheres properly. Next, heat the metal slightly to make it more pliable. Remember, using the right tools can significantly impact the outcome of your repair. Apply a hot glue bead to your chosen glue tab, then attach it to the center of the dent. Use your glue puller to gently pull the dent out in small increments, watching the metal carefully. For any high spots, employ a knockdown hammer or push rod to smooth out the surface. Additionally, consider using the right oil for your tools to enhance performance and ensure a successful repair process. Finally, check your work to verify a near-original finish, and admire your handy repair skills!
Common Challenges and How to Avoid Them

While fixing small dents in your truck bed can be rewarding, you might encounter several common challenges that could complicate the process. To avoid these pitfalls, keep these tips in mind:
- Heat Control: Ensure you use the right amount of heat; too much can crack the paint, while too little can weaken glue.
- Surface Preparation: Always clean the dented area thoroughly before applying glue. Contaminants can interfere with adhesion and lead to failure.
- Gentle Pulling: Avoid over-pulling. Pull in small increments to prevent high spots or creases from forming, which can complicate the repair.
Alternative Methods for Severe Dents in Truck Beds

Sometimes, small dents aren’t the only issue you’ll face with your truck bed; severe dents can pose a greater challenge. For these, consider using traditional methods like heating the metal with a torch and employing jacks or dollies to push the dents out from behind. If the damage is extensive, weld-type dent pullers might be necessary, though they require skill and could need repainting afterward. Combining glue pulling with strategic pushing can also yield impressive results. Remember, if you’re applying a bed liner afterward, ensure the repairs are well done to prevent future issues. Prioritizing paint preservation during these processes will keep your truck looking sharp while maintaining its value. Additionally, understanding small appliance maintenance can help you keep your tools in top shape for these repairs. Properly maintaining your tools is essential for achieving reliable performance during these challenging dent repairs. Using space-saving techniques can also help you efficiently organize your tools and materials for a smoother repair process. Furthermore, utilizing smart appliances can streamline your workflow and provide assistance in managing your tasks efficiently. Always ensure to have the right DIY tools on hand, as they can significantly impact the quality of your repairs.
Frequently Asked Questions
Can I Use Household Items for Dent Repair?
Yes, you can use some household items for dent repair. For instance, a hairdryer can heat the metal to soften it, making it easier to push the dent out. You might also try using a plunger to pull out smaller dents. Just make sure to clean the area first to guarantee better adhesion. While these methods can work, they may not be as effective as professional tools, so manage your expectations.
How Long Does the PDR Process Take?
The PDR process typically takes anywhere from 30 minutes to a few hours, depending on the dent’s size and location. If you’re dealing with multiple dents, it might take longer. You’ll want to start by cleaning and heating the area, then applying the appropriate tools for pulling. Keep in mind that larger or deeper dents may require more time and finesse to guarantee a smooth, flawless finish without damaging the paint.
Is It Safe to Attempt Repairs in Cold Weather?
“Strike while the iron is hot” doesn’t apply to cold weather repairs! It’s best to avoid attempting dent repairs in low temperatures. Cold air can weaken glue strength, making it difficult for you to pull out dents effectively. Additionally, the metal might not respond well to your techniques, risking paint damage. If repairs are necessary, consider warming the area beforehand to ensure better results and protect your truck’s finish.
Will DIY Repairs Affect My Truck’s Warranty?
DIY repairs can potentially affect your truck’s warranty, depending on the manufacturer’s policy. If you perform repairs that result in further damage or compromise the vehicle’s integrity, they might deny warranty claims. Always check your warranty terms before attempting repairs. To be safe, consider consulting a professional for significant issues, as they can maintain your truck’s warranty while ensuring quality repairs. Keep your truck in top shape without risking valuable coverage!
How Often Should I Inspect for New Dents?
Diligently detect dents! You should inspect your truck bed for new dents at least once a month. Regularly checking helps you catch any minor issues before they escalate. After road trips or heavy use, give it a good look. Remember, prompt detection and action can save you from costly repairs later. Maintaining your truck’s appearance not only preserves its value but also keeps it looking sharp and ready for adventure.
Conclusion
By tackling those small dents in your truck bed now, you’re not just preserving its appearance; you’re protecting your investment from bigger headaches down the road. Think of your truck as a canvas—each dent is a brushstroke that tells a story, but you get to choose how that story unfolds. With the right tools and techniques, you can restore that pristine look and keep your truck ready for every adventure. Don’t let small issues snowball into a nightmare!